Working with SQLite
Installed TileMill on your computer.
Reviewed Crash Course
In this guide, we will walk through the steps to add a layer from a SQLite database and join additional attribute data to the geographic information. TileMill supports using SQLite databases as geographic datasources and thus offers an alternative to shapefiles.
If you are not familiar with SQLite, check out their documentation resources. SQLite databases can store geographic features along with non-geographic attribute data. SQLite files can be edited with any SQLite client, including free GIS tools like Quantum GIS or SQLite Database Browser. See note in Step 7 about downloading a SQLite editor to work with your files.
We’ll begin by adding polygon features of the District of Columbia Census tract boundary downloaded from the U.S. Census Bureau TIGER/Line database. The original files were downloaded as shapefiles, but we’ve used QGIS to convert and save as a SQLite database. We’ll begin there and create a new database.
Creating SQLite database files
- To begin, download the 2010 District of Columbia Census Tract TIGER/Line shapefile from the U.S. Census Bureau. Select
Census TractsandDistrict of Columbiafor Census Tract (2010). ChooseDistrict of Columbiain the final menu. A zipped shapefile will be downloaded. - Unzip the shapefile and open it up in QGIS.
- Right-click on the layer named
tl_2010_11001_tract10within the Layers window. Click Save As.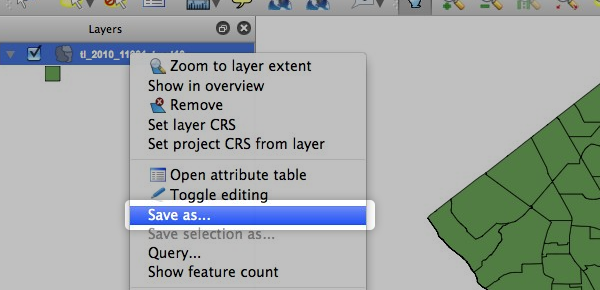
- Select SQLite for the Format, and enter
dc-census-tractsfor the Save as name. You can browse to select the directory to save the file.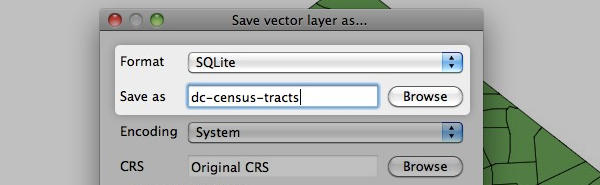
- Download Census Tract data for the District of Columbia from the CENSUS.IRE.ORG. Select
P1. Total Populationand download as CSV.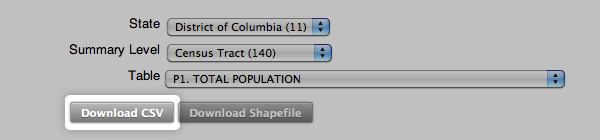
- For a smooth import into a SQLite database, we need to clean up the headers within the CSV. Open the CSV in a text editor. The first line is the header line. Within the header line, remove any periods (“.”). Save your changes.

- To work with an SQLite file, we need an editor to create, edit, and browse through the database files. There are several free or inexpensive programs. One open source, free program is the SQLite Database Browser. It is available for Mac OSX, Linux, or Windows. Download, unzip, and run the file to install.
Note: SQLite Editors
There are many spreadsheet-like GUI editors available for OSX, Linux, and Windows. You can download an editor to work with your SQLite files, or alternatively, you can edit and manipulate SQLite through the command-line utility named, sqlite3 (sqlite3.exe on Windows).
</small>
- Open SQLite Browser and create a new database by choosing File > New from the menu. Save your new database as
dc-census-data.sqlite. A create table window will pop up and ask you to create a table, clickCancelto by-pass this step. - Choose File > Import > Table from CSV File from the menu. Locate the
all_140_in_11.P1.csvfile and click Open. - Enter
datain the New table name field and check the box for Extract field names from first line. Click Create. Save your changes.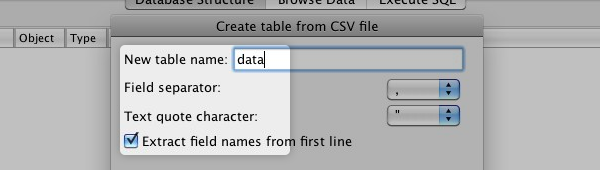
- Move your newly creating SQLite files to the
/Mapbox/Data/folder for use in TileMill.
Adding SQLite layers
- To begin, we’ll work with an existing TileMill project. We’ve called ours
dc-census. - Click to add a new layer.
- Change the add layer type to
SQLite. You will see the fields change. - Enter
dcin the ID field.
- For the Datasource field, click Browse to find the SQLite files located on your computer. Browse to the
/Mapbox/Data/folder. - Select the SQLite file with your geographic features,
dc-census-tracts.sqliteto fill in the Datasource field and then click Done to confirm your selection. - For the Table or subquery field, enter
( SELECT * from dc_census_tracts ). This is a query to select the data from tabledc-census-tractswithin your SQLite database. This field acts as a subquery so the information must be entered in a subquery fashion. The name you specify after “AS” is arbitrary and does not affect theIDfield you gave at the top. We’ll skip the Attach DB field at the moment, and pick it up below when adding attribute data to your geographic features in the section below.
 - Select the Spatial Reference System (SRS) for your feature. This will be the projection your data is in PostGIS. Since the Census TIGER/Line data is projected in the NAD83 geographic projection (EPSG:4269), we will use custom parameters here for TileMill to assume the correct datum and ellipsoid for projecting data (we have provided the correct custom parameters here, but can also be obtained from here).
Select Custom and enter
+proj=longlat +ellps=GRS80 +datum=NAD83 +no_defs.
- Click Save and Style to add your layer with the default CartoCSS settings.
- Preview the result in the map preview pane.
Add attribute data (SQLite Join)
- From within the Editor window of the
dc-census-tractsproject, toggle on the layer selector and click Edit next to thedclayer you just added in the previous section.
- Move down to the Attach DB field. This is the field for attaching additional databases to base an SQL join statement on to add attribute data to your geographic features.
- Enter
data@[ path to your ]/MapBox/data/dc-census-data.sqliteto provide the path information to the SQLite file we created from the Census total population data for the District of Columbia.
-
Within the Table or subquery field, adjust the existing query to be:
( SELECT * from dc_census_tracts JOIN data on dc_census_tracts.geoid10 = data.geoid )
- Click Save to save your changes.
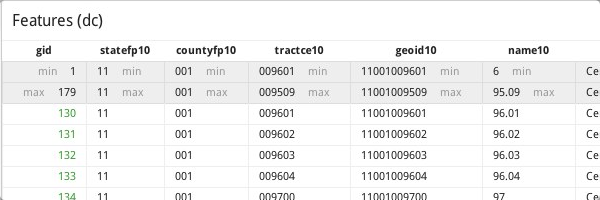
- Within the layer menu, click the Features button to explore the data table. You will now see the attribute data columns.

- Click the X or hit the
escon your keyboard to exit out of the table view. You can now begin to use conditional styles or add additional data to your interactivity.
Using conditional styles to control the appearance of points based on data.
Using MapBox to upload and composite your map.