Styling Labels
Installed TileMill on your computer.
Reviewed Crash Course
Are aware of Symbol Ordering to know how to troubleshoot when labels are not placed on top
Basic Point Labels
In CartoCSS, labelling is handled by a variety of properties beginning with text-. For each text-related style there are two required properties: text-name, which specifies what text goes in the labels, and text-face-name, which specifies the typeface(s) will be used to draw the label. (You can see which typefaces are available in the font browser - click the ‘A’ icon on the left button bar.)
The text-name property can pull text from your layer’s data fields. If your layer contains a column called NAME, a simple label style would look like this:
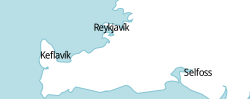
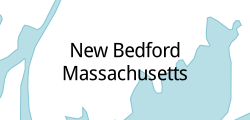
#cities {
  text-name: [NAME];
  text-face-name: 'Droid Sans Regular';
}
The color and size of these labels will be the defaults - black and 10 pixels respectively. These can be adjusted with the text-fill and text-size properties.
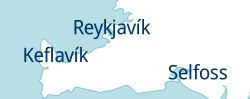
#cities {
  text-name: [NAME];
  text-face-name: 'Droid Sans Regular';
  text-fill: #036;
  text-size: 20;
}
To separate your text from the background, it is often useful to add an outline or halo around the text. You can control the color with text-halo-fill and the width of the halo (in pixels) is controlled with text-halo-radius. In the example below, we are using the fadeout color function to make the white halo 30% transparent.

#cities {
  text-name: [NAME];
  text-face-name: 'Droid Sans Regular';
  text-fill: #036;
  text-size: 20;
  text-halo-fill: fadeout(white, 30%);
  text-halo-radius: 2.5;
}
Text Along Lines
You can also use CartoCSS to style labels that follow a line such as a road or a river. To do this we need to adjust the text-placement property. Its default is point; we’ll change it to line. We’ve also added a simple style to visualize the line itself.
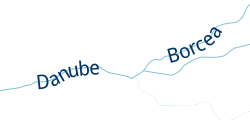
#rivers {
  line-color: #85c5d3;
  text-name: [NAME];
  text-face-name: 'Droid Sans Regular';
  text-fill: #036;
  text-size: 20;
  text-placement: line;
}
For rivers it is nice to have the label offset parallel to the line of the river. This can be easily done with the text-dy property to specify how large (in pixels) this offset should be. (dy refers to a displacement along the y axis.)
We’ll also adjust the text-max-char-angle-delta property. This allows us to specify the maximum line angle (in degrees) that the text should try to wrap around. The default is 22.5°; setting it lower will make the labels appear along straighter parts of the line.
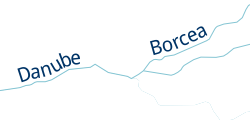
#rivers {
  line-color: #85c5d3;
  text-name: [NAME];
  text-face-name: 'Droid Sans Regular';
  text-fill: #036;
  text-size: 20;
  text-placement: line;
  text-dy: 12;
  text-max-char-angle-delta: 15;
}
Adding custom text
Labels aren’t limited to pulling text from just one column. You can combine data from many columns as well as arbitrary text to construct your text-name. For example you could include the state/province separated by a comma and a space.
#cities {
  text-name: [NAME] + ', ' + [ADM1NAME];
  text-face-name: 'Droid Sans Regular';
  text-size: 20;
}
Other potential uses:
- Multilingual labels:
[name] + '(' + [name_en] + ')' - Numeric units:
[elevation] + 'm' - Clever unicode icons:
'⚑ ' + [embassy_name]or'⚓ ' + [harbour_name]
You can also assign arbitrary text to labels that does not come from a data field. Due to a backwards-compatibility issue, you will need to quote such text twice for this to work correctly.
#parks {
  text-name: "'Park'";
  text-face-name: 'Droid Sans Regular';
}
If you need to include quotation marks in your custom quoted text, you will need to escape them with a backslash. For example, for the custom text City’s “Best” Coffee:
text-name: "'City\'s \"Best\" Coffee'";
Multi-line labels
You can wrap long labels onto multiple lines with the text-wrap-width property which specifies at what pixel width labels should start wrapping. By default the first word that crosses the wrap-width threshold will not wrap - to change this you can set text-wrap-before to true.

#cities {
  text-name: [NAME] + ', ' + [ADM1NAME];
  text-face-name: 'Droid Sans Regular';
  text-size: 20;
  text-wrap-width: 100;
  text-wrap-before: true;
}
Note that text wrapping not yet supported with text-placement: line.
You may have a specific point where you want the line breaks to happen. You can use the text-wrap-character to cause labels to wrap on a character other than a space. With a properly constructed dataset this can give you better control over your labels.
For example we could alter our compound label example to separate the two fields only with an underscore. Setting the wrap character to _ (and also setting a very low wrap width to force wrapping) ensures that the two fields will always be written on their own lines.
#cities {
  text-name: [NAME] + '_' + [ADM1NAME];
  text-face-name: 'Droid Sans Regular';
  text-size: 20;
  text-wrap-width: 1;
  text-wrap-character: '_';
}
Layering Labels
If you are applying label styles to layers that also have line or polygon styles you might notice some unexpected overlapping where the labels aren’t necessarily on top.
For simple stylesheets you can control this by making sure your geometry styles and your text styles are in separate attachments:
#layer {
  ::shape {
    polygon-fill: #ace;
    line-color: #68a;
  }
  ::label {
    text-name: [name];
    text-face-name: 'Arial Regular';
  }
}
However in many cases you’ll need to create a label layer that is separate from the layer you use for line and polygon styling. As an example of this, you can look at the Open Streets DC project that comes with TileMill.
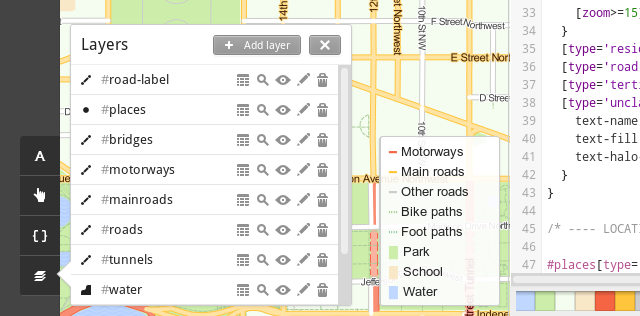
The layers roads and roads-label reference the same data, but are separated for correct ordering. For more details on how object stacking works in TileMill, see the Symbol Drawing Order guide.
Get tips on achieving visually-pleasing results for placement of point labels in the Advanced labels guide.
Explore the full list of available label styling properties in the CartoCSS Reference.
Learn about symbol ordering to control which labels are prioritized over others.