Symbol Drawing Order
Installed TileMill on your computer.
Reviewed Crash Course
Objects in TileMill are drawn using a Painter’s Algorithm, meaning everything is drawn in a specific order, and things that are drawn first might be covered by things that are drawn later.
Overview
The order in which objects are drawn depends on the following conditions. See the sections that follow for more details.
- Layers: “Higher” layers obscure “lower” ones.
- Stylesheets are applied from left to right.
- Rules within a Stylesheet are applied from top to bottom. This means two things: a. objects matched by later rules will be drawn over those defined by earlier rules; and b. attachments may be redefined by later rules.
- Attachments (eg,
::glow { ... }) within a Stylesheet are applied from top to bottom. - Lastly, all else being equal, objects are drawn in the order in which they are found, such as in PostGIS.
Order vs. Priority
For things like lines and areas, objects that are drawn first are less likely to be fully visible. Objects high in the stack might completely obscure other objects, thus you might associate these with a high ‘priority’ or ‘importance’.
However for things like text, markers, and icons that have their allow-overlap properties set to false (the default) things work a bit differently. Objects that are drawn first are more likely to be visible; instead of letting things sit on top of each other, overlapping objects are simply skipped. Since such objects higher in the stack are less likely to be drawn, you might associate these with a low ‘priority’ or ‘importance’.
Layer Ordering
Layers are the most basic and explicit way of controlling the order of elements on a map in TileMill. Layers are rendered in order starting at the bottom of the layers list moving up. You can adjust the position of each layer in the stack by clicking and draggin on its geometry icon.
If you look at the example projects that come with TileMill, you can see that the basic parts of the map (eg. landuse areas, water) are in layers at the bottom of the list. The things that shouldn’t be covered up by anything else (eg. labels, icons) are in layers at the top of the list.
Attachment Ordering
Within a layer, styles can be broken up into ‘attachments’ with the :: syntax. Think of attachments like sub-layers.
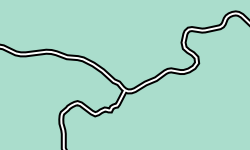
#layer {
  ::outline {
    line-width: 6;
    line-color: black;
  }
  ::inline {
    line-width: 2;
    line-color: white;
  }
}
Attachments are drawn in the order they are first defined, so in the example above the ::outline lines will be drawn below the ::inline lines.
Note that all styles are nested inside attachments. If you don’t explicitly define one, a default attachment still exists. Thus the following style produces the same result as the one above.
#layer {
  ::outline {
    line-width: 6;
    line-color: black;
  }
  line-width: 2;
  line-color: white;
}
Data Ordering
Within each attachment, the order that your data is stored/retrieved in is also significant.
When styling city labels, for example, it’s good to ensure that the order of your data makes sense for label prioritization. For data coming from an SQL database you should ORDER BY a population column or some other prioritization field in the select statement.
Data coming from files are read from the beginning of the file to the end and cannot be re-ordered on-the-fly by TileMill. You’ll want to pre-process such files to make sure the ordering makes sense.
You can do this from the terminal with ogr2ogr (see Setting up GDAL). This example rearranges all the objects in cities.shp based on the population field in descending order (highest population first).
ogr2ogr -sql \
  'select * from cities order by population desc' \
  cities_ordered.shp cities.shp
Symbolizer Ordering
Each object in each attachment may have multiple symbolizers applied to it. That is, a polygon might have both a fill and an outline. In this case, the styles are drawn in the same order they are defined.
In this style, the outline will be drawn below the fill:
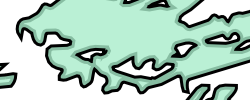
#layer {
  line-width: 6;
  polygon-fill: #aec;
  polygon-opacity: 0.8;
}
In this style, the line is drawn on top of the fill:
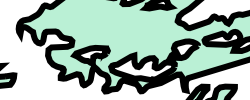
#layer {
  polygon-fill: #aec;
  polygon-opacity: 0.8;
  line-width: 6;
}
It’s also possible to create multiple symbols of the same type within an attachment using named instances. Like attachments, their names are arbitrary.
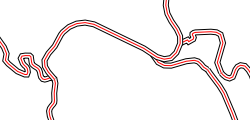
#layer {
  bottomline/line-width: 6;
  middleline/line-width: 4;
  middleline/line-color: white;
  topline/line-color: red;
}
Note that symbolizer ordering happens after all other types of ordering - so an outline might be on top of one polygon but beneath a neighboring polygon. If you want to ensure lines are always below fills, use separate attachments.