Understanding Metatiles
Installed TileMill on your computer.
Reviewed Crash Course
TileMill displays maps in small seamless chunks referred to as tiles. Although displayed individually, TileMill generates groups of images at once in batches before separating them into the final tiles - this improves efficiency in various ways.
When designing maps in TileMill it is sometimes necessary to understand how metatiles work in order to create your style effectively and work around certain types of issues. Metatile settings play a particularly important role when working with labels, markers, and patterns in your stylesheet.
Structure of a metatile
There are two main parts to a metatile: the tiles and the buffer. By default a metatile in TileMill consists of 4 tiles (arranged 2 wide and 2 high) and a buffer of 256 pixels around the tiles.
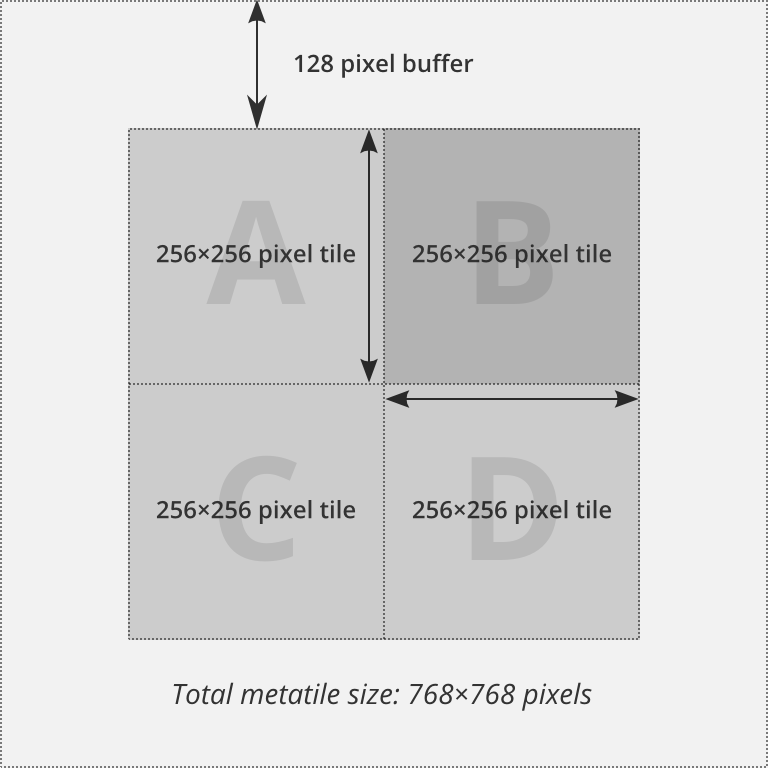
The area within the buffer is drawn but never displayed - the purpose is to allow labels, markers, and other things that cross over the edge of a metatile to display correctly. Without a buffer you would notice many cut-off labels and icons along the seams between every other tile.
Adjusting metatile settings
TileMill allows you to configure the number of tiles included in a metatile as well as the width of the buffer.
To adjust the number of tiles, open the project settings (wrench icon) and drag the MetaTile size slider to your desired size. The number represents how many tiles high and wide your metatile will be, thus the total number of tiles in each batch will be the square of this value.
Adjusting the width of the buffer is done in CartoCSS. Add a buffer-size property to your Map object. The value must be a whole number and represents pixel units. Example:
Map {
  background-color: white;
  buffer-size: 256;
}
Choosing your buffer size
If you are noticing problems with your map such as cut off labels & icons you should try increasing your buffer size. A good starting point for choosing a buffer size is to make it about the width of your widest labels.
Choosing your metatile size
For most projects it’s reasonable to use the default metatile size (2). This means that tiles will be rendered in 512 px chunks and then broken down into 256 px tiles before being returned to the map view. When one or more adjacent tile requests hit the same metatile the renderer will pause momentarily to process the metatile a single time before slicing and then returning each individual 256 px tile to the map view.
There is one reason why you might want to lower the size to 1, and two main reasons you may want to increase the metatile size above 2 to values like 8 or 16.
Going smaller
There is only one size down from the default metatile size of 2; this effectively disables metatiling. Doing this can help the map view feel slightly more responsive during editing and light browsing because each individual tile will appear as fast as it can, alone, be rendered. If the current part of the map you are viewing has some tiles with lots of data and other tiles with less data, avoiding metatiling will ensure that the tiles with less data will load quicker than adjacent tiles with more data.
Going larger
Reason 1: reducing export time
While disabling metatiling can give a more responsive feel to the map UI, the opposite is true when exporting to MBTiles. Increasing the metatile size can significantly increase overall performance and decrease the overall time it takes to render an entire export job. This is because rendering many tiles in sequence using larger metatiles means doing less overall work.
There is no hard rule about how large your metatile should be for the best export performance. It will depend on how much data your project contains, how well it is spatially indexed, and how much memory your machine has.
We recommend experimenting by setting up a reduced export job (just a few zoom levels or perhaps a more restricted area) and testing the export completion time as you gradually increase the metatile size to 4, 8, or 16.
Reason 2: reducing rendering problems at tile edges
Larger metatiles mean that things like labels and markers are less likely to be rendered at a tile edge. It also means that labeling algorithms, like the one that can throw out duplicate names (if text-min-distance is set) can work over larger areas of the map and will be more successful at reducing duplicates for a given view.