Advanced legends
When designing a legend for TileMill that requires more than plain text, there are a few paths you can take. An image, html/css, or a combination. Both have their advantages and disadvantages.
Insert an image
For complex graphics and those that feel more comfortable designing in a graphics editor. This involves creating a PNG or JPG and either serving it on the web and linking to it, or base64-encoding it directly into the legend.
The advantage with images is that you have the ability to design every pixel and they can be as complex as you want. The drawback is that the image is static once it’s in the map, and it may not be as easy to update, as you need the original file and software that can open it.
HTML/CSS
For simpler, table-like designs and those that feel more comfortable designing with code. This involves creating the layout and styling for the legend elements in the same way one would build a web page.
The advantage with html/css is that you can quickly make edits to the legend directly in TileMill, and maintain the ability to manipulate the legend styling with css even after the map has been exported to MBTile format. However, you are limited to right angles and solid colors, and may have to write many lines of code to create a relatively simple design.
Another big advantage with html/css is that you can easily pass the source code from project to project and person to person. Below are a couple of basic templates for getting started, and how you can make them your own. This is not intended to be a tutorial on html or css. If you would like to learn more about these languages, check out the great guides at tizag.com.
Copy and paste the block of code directly into TileMill’s legend field. Then follow this guide to tweak the template for your own purposes.
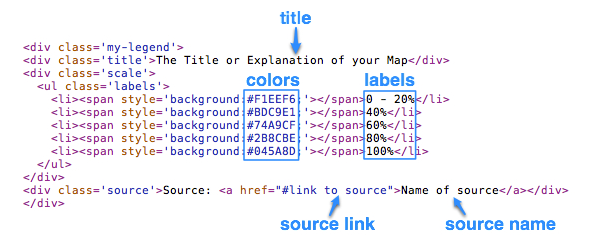
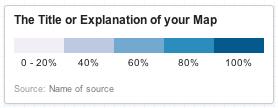
1. Horizontal Sequential
<div class='my-legend'>
<div class='legend-title'>The Title or Explanation of your Map</div>
<div class='legend-scale'>
  <ul class='legend-labels'>
    <li><span style='background:#F1EEF6;'></span>0 - 20%</li>
    <li><span style='background:#BDC9E1;'></span>40%</li>
    <li><span style='background:#74A9CF;'></span>60%</li>
    <li><span style='background:#2B8CBE;'></span>80%</li>
    <li><span style='background:#045A8D;'></span>100%</li>
  </ul>
</div>
<div class='legend-source'>Source: <a href="#link to source">Name of source</a></div>
</div>

<style type='text/css'>
  .my-legend .legend-title {
    text-align: left;
    margin-bottom: 8px;
    font-weight: bold;
    font-size: 90%;
    }
  .my-legend .legend-scale ul {
    margin: 0;
    padding: 0;
    float: left;
    list-style: none;
    }
  .my-legend .legend-scale ul li {
    display: block;
    float: left;
    width: 50px;
    margin-bottom: 6px;
    text-align: center;
    font-size: 80%;
    list-style: none;
    }
  .my-legend ul.legend-labels li span {
    display: block;
    float: left;
    height: 15px;
    width: 50px;
    }
  .my-legend .legend-source {
    font-size: 70%;
    color: #999;
    clear: both;
    }
  .my-legend a {
    color: #777;
    }
</style>
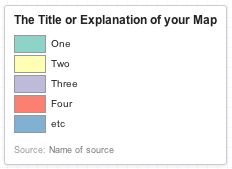
2. Vertical Qualitative
<div class='my-legend'>
<div class='legend-title'>The Title or Explanation of your Map</div>
<div class='legend-scale'>
  <ul class='legend-labels'>
    <li><span style='background:#8DD3C7;'></span>One</li>
    <li><span style='background:#FFFFB3;'></span>Two</li>
    <li><span style='background:#BEBADA;'></span>Three</li>
    <li><span style='background:#FB8072;'></span>Four</li>
    <li><span style='background:#80B1D3;'></span>etc</li>
  </ul>
</div>
<div class='legend-source'>Source: <a href="#link to source">Name of source</a></div>
</div>

<style type='text/css'>
  .my-legend .legend-title {
    text-align: left;
    margin-bottom: 5px;
    font-weight: bold;
    font-size: 90%;
    }
  .my-legend .legend-scale ul {
    margin: 0;
    margin-bottom: 5px;
    padding: 0;
    float: left;
    list-style: none;
    }
  .my-legend .legend-scale ul li {
    font-size: 80%;
    list-style: none;
    margin-left: 0;
    line-height: 18px;
    margin-bottom: 2px;
    }
  .my-legend ul.legend-labels li span {
    display: block;
    float: left;
    height: 16px;
    width: 30px;
    margin-right: 5px;
    margin-left: 0;
    border: 1px solid #999;
    }
  .my-legend .legend-source {
    font-size: 70%;
    color: #999;
    clear: both;
    }
  .my-legend a {
    color: #777;
    }
</style>
The legend class
TileMill legends can be contained within an element with a custom class (e.g. my-legend). This is why you see it included in each selector in the above style sections. This class is attributed several default styles, including a max-width of 280 pixels and a max-height of 400 pixels. Under normal circumstances this should be plenty large enough. You’ll know they’re not if you see a scrollbar in your legend. In case you ever need to change these, here’s how.
Inside the <style></style> tags add a selector for my-legend and declare the new value(s). For values that are overriding previous declarations, you will likely need to add the !important tag. Say you want to increase the width to 300 pixels:
.my-legend {
  max-width: 300px !important;
  }