Georeferencing Satellite Images
Installed TileMill on your computer.
Reviewed Crash Course
Set up GDAL for processing raster data in the terminal.
The skies were clear on President Obama’s first Inauguration and GeoEye was there to capture the incredible imagery from space.
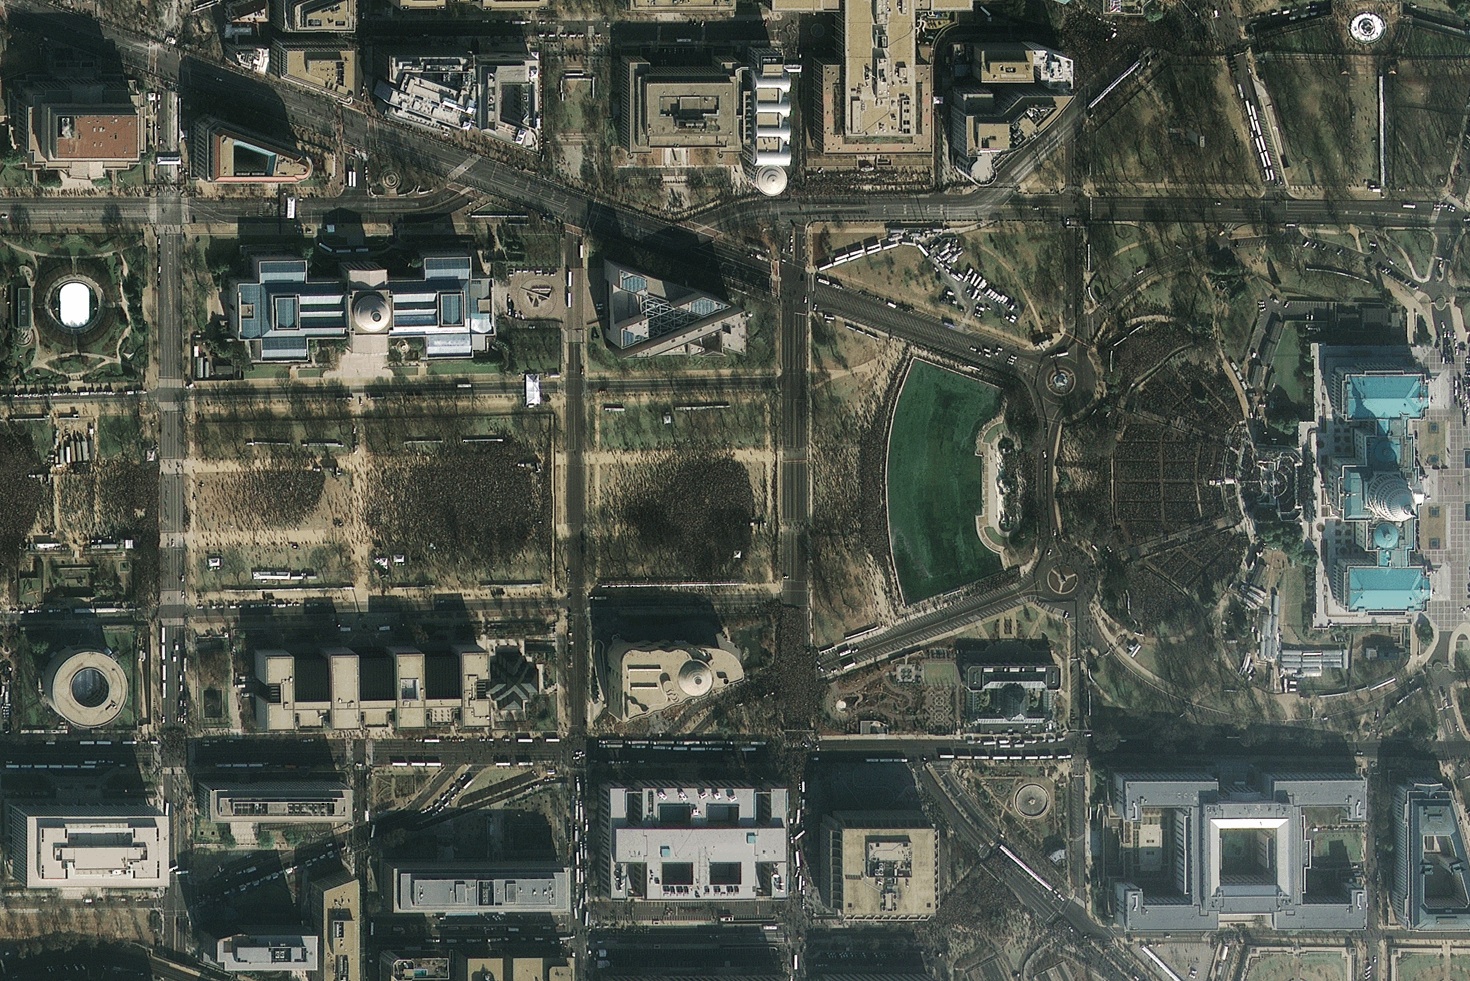
GeoEye | 2009 Inauguration
Using GDAL, QGIS, and MapBox Satellite, we were able to manually georeference the 2009 imagery and compare the ceremony attendance and changes to the city with our own MapBox Satellite layer.
Below, we go over the steps of how to take a non-georeferenced JPEG image and turn it into a geospatial dataset ready for rendering in TileMill and uploading to MapBox hosting. We use three free, open-source software libraries: Quantum GIS (These instructions are based off of QGIS version 1.8.0 Lisboa), GDAL, and TileMill.
Manual Georeferencing
1. Open up QGIS and activate the Georeferencer plugin from within the Plugins drop-down menu.
2. Open raster dataset in Georeferencer window.
3. Log in to your MapBox account and create a new map layer. To create a Satellite base layer, you’ll need a basic account or higher.
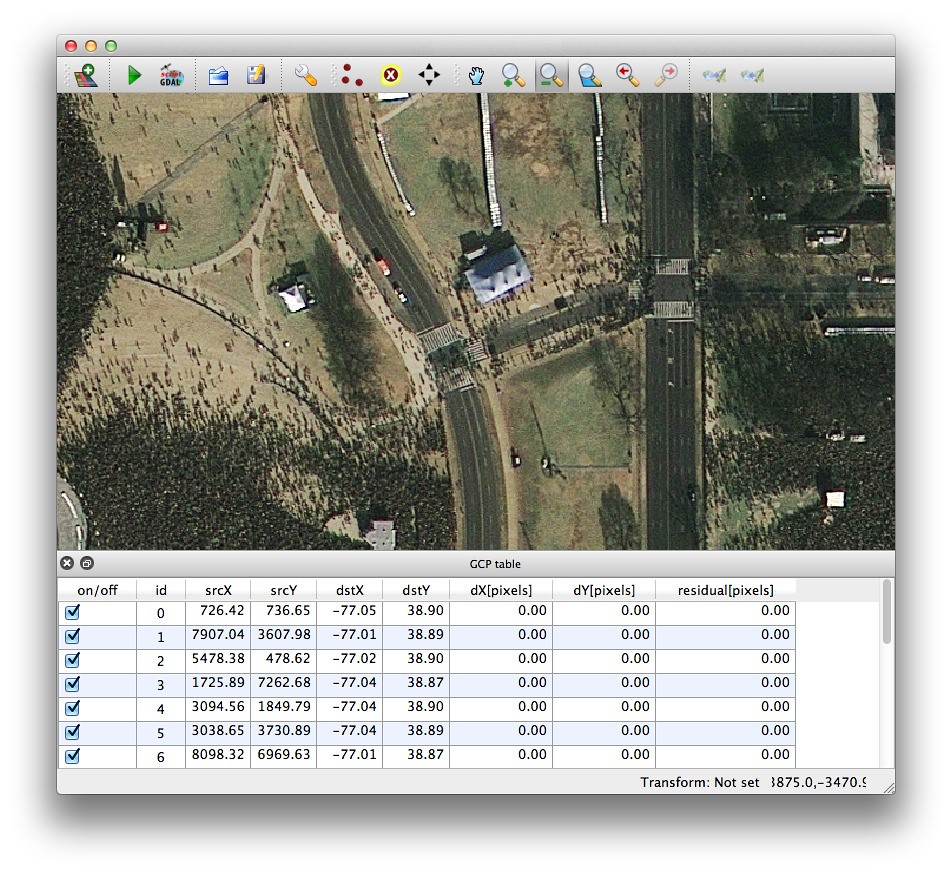
4. In the Georeferencer window in QGIS, choose a recognizable location on the source image. Select the Add a Point tool (Command + A), and add a point on the source image over the location. Here we are using the corner of 15th Street NW and Madison Dr. NW, across from the Washington Monument.
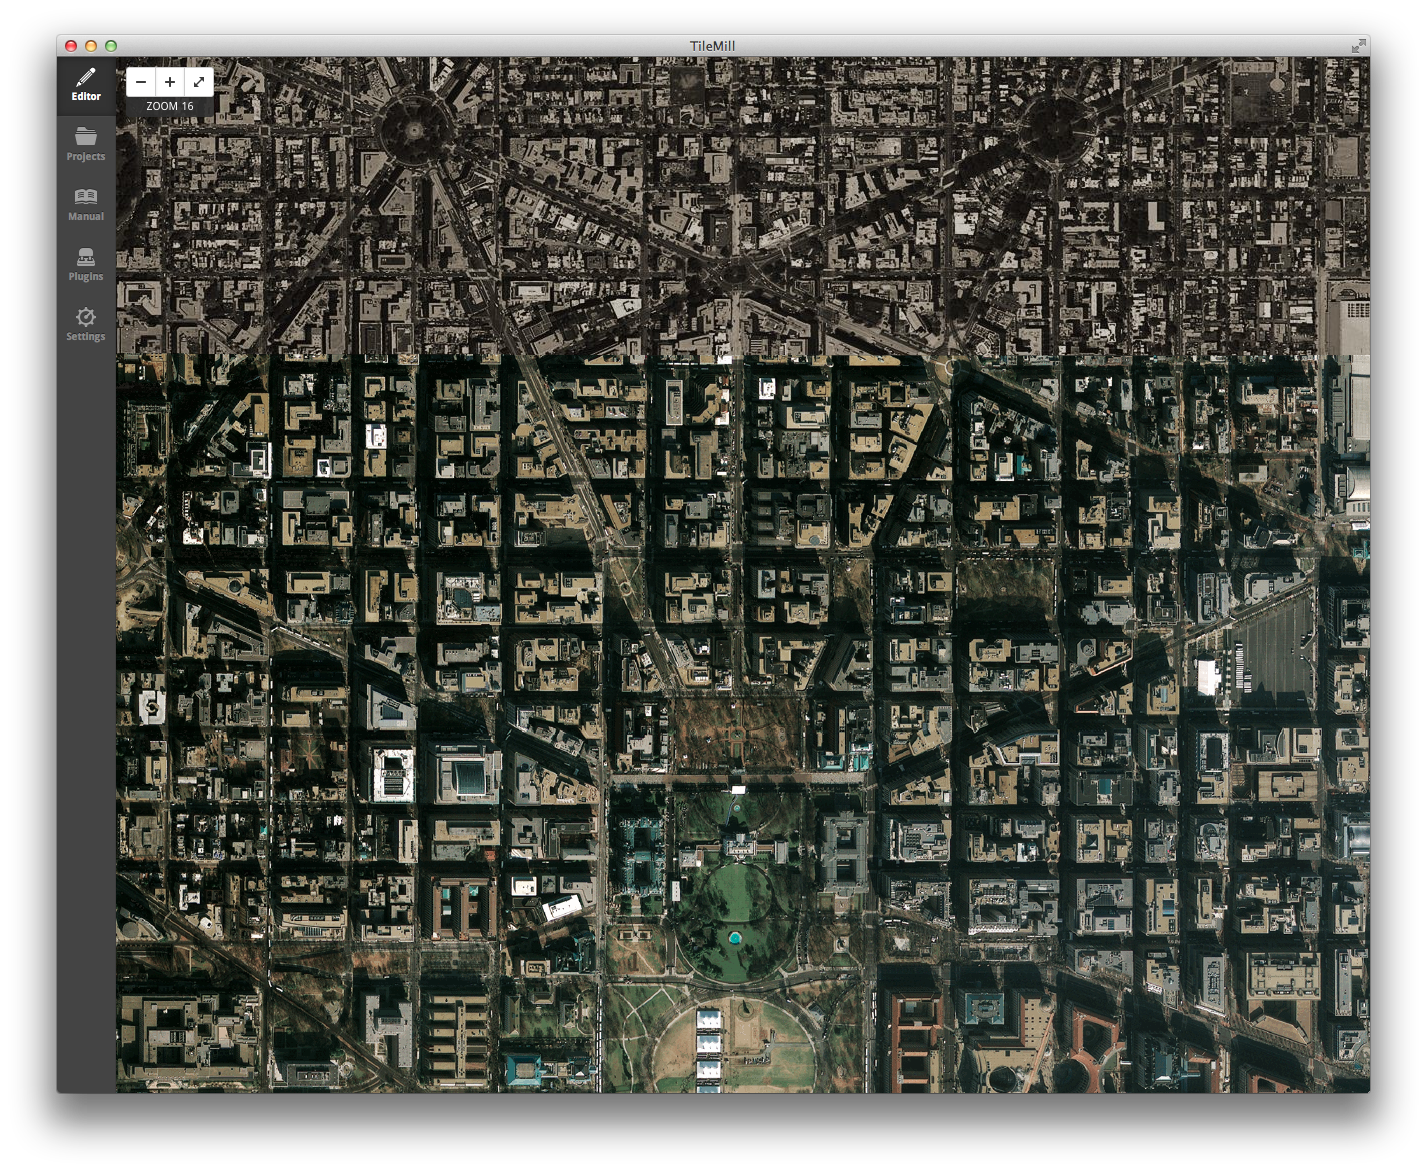
5. Search for the same location on the map shown in your custom MapBox Satellite layer, keeping the point of interest in the center of the screen. Here’s a screenshot of the area on the source image.
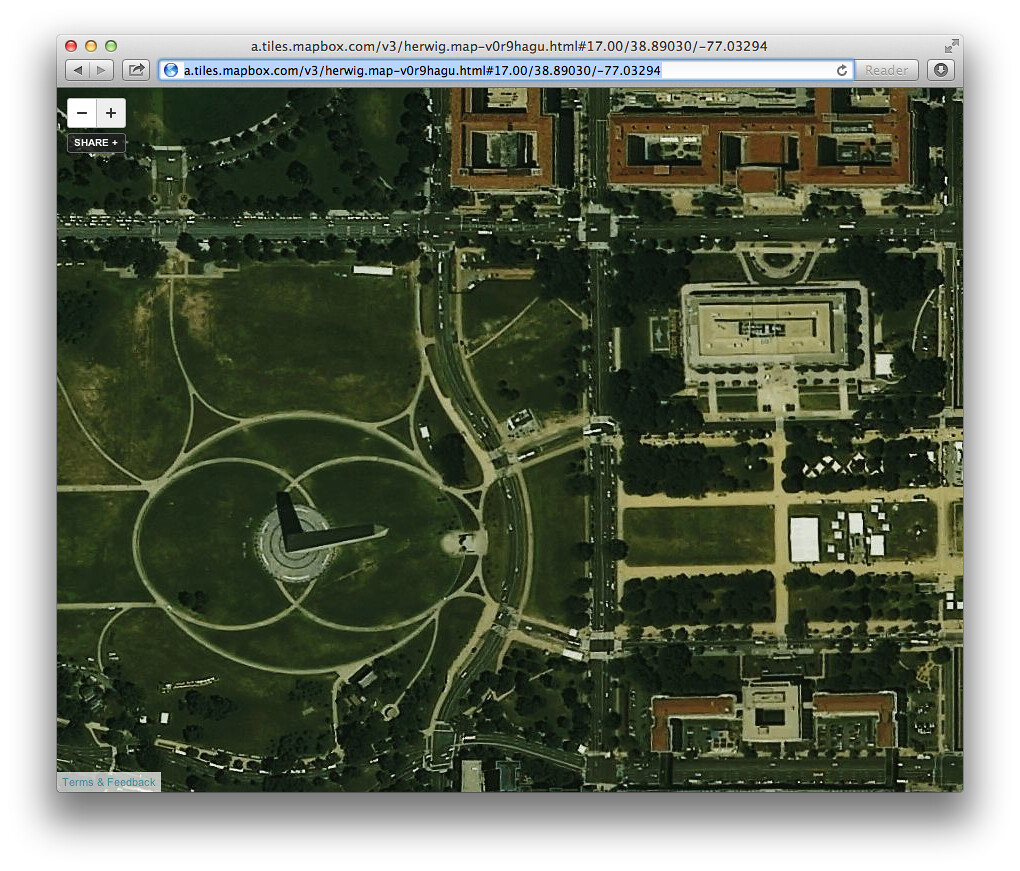
MapBox Satellite
Take a look at the url hash at the end of the MapBox url.
#17.00/38.89030/-77.03294
The first number after the # is the zoom level, the second is latitude, and the third is longitude.
Latitude: 38.89030
Longitude: -77.03294
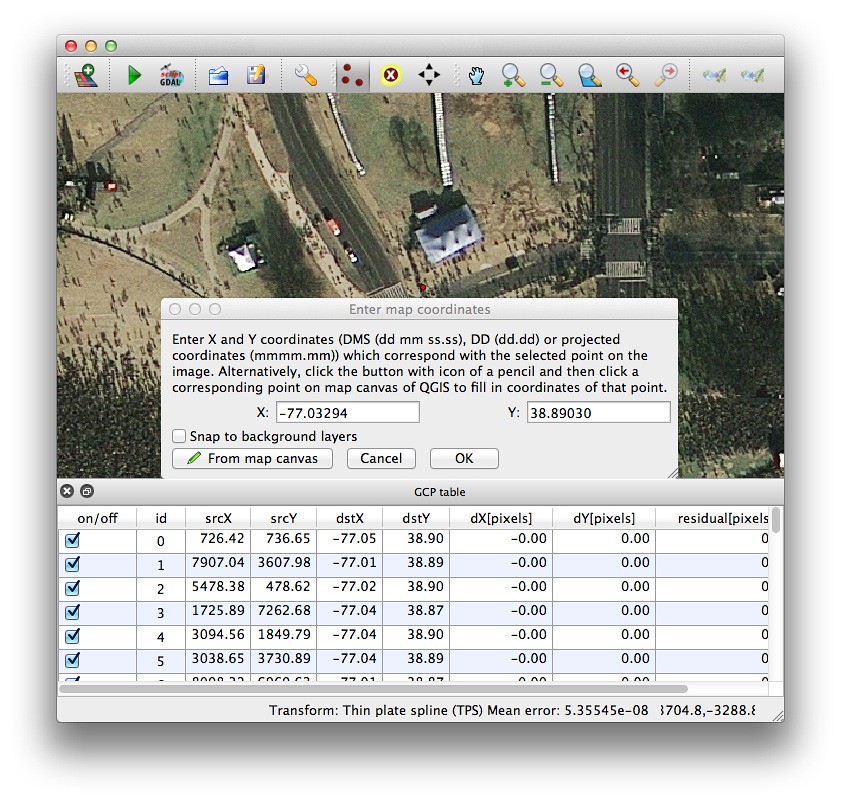
6. Back in QGIS, use the values obtained from the url hash in the “Enter Map Coordinates” dialog. The second number from the URL hash, latitude, is the Y value; the third number,longitude, from the hash is the X value.
7. Repeat steps 6-8 until you’ve added the desired number of control points to the image. A good rule of thumb here is to start with the four corners and work your way inward. To meet the project accuracy requirements, we added a total of 37 ground control points. Be sure to save your ground control points using the “Save GCP Points as” option in the georeferencer plugin. That way, you can reopen the project at a later date to modify points or add additional ones to improve spatial accuracy.
8. You can either perform the georeferencing within QGIS, or select the “Generate GDAL Script” from QGIS. We selected Thin Plate Spline transformation, Lanczos resampling, no compression, and generated a script to modify before running.
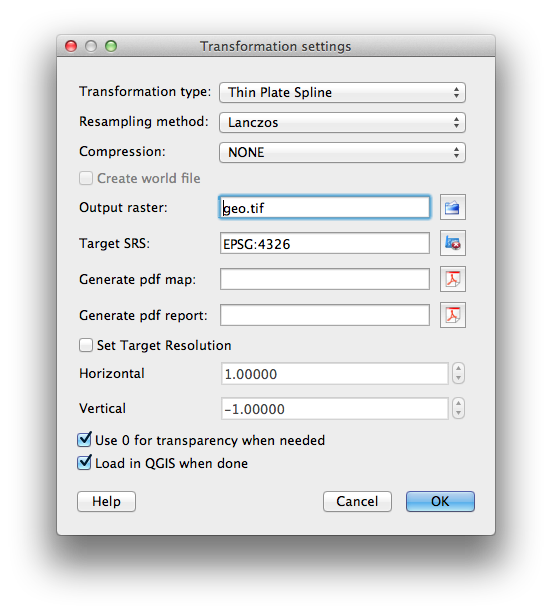
Here’s our final processing script, which incorporates the QGIS-generated ground control points, and my project-specific projection, resampling, and overview settings.
#!/bin/bash

ADDO="2 4 8 16 32 64 128 256 512 1024 2048 4096 8192"

gdal_translate \
  -of GTiff \
  -a_nodata "0 0 0" \
  -a_srs EPSG:4326 \
  -gcp 726.415 736.655 -77.0501 38.9025 \
  -gcp 7907.04 3607.98 -77.0091 38.8898 \
  -gcp 5478.38 478.625 -77.0231 38.9037 \
  -gcp 1725.89 7262.68 -77.0443 38.8731 \
  -gcp 3094.56 1849.79 -77.0365 38.8975 \
  -gcp 3038.65 3730.89 -77.0367 38.889 \
  -gcp 8098.32 6969.63 -77.0076 38.8744 \
  -gcp 6988.43 324.384 -77.0141 38.9044 \
  -gcp 8066.53 1871.22 -77.0079 38.8974 \
  -gcp 735.208 3692.09 -77.0501 38.8893 \
  -gcp 166.054 6045.52 -77.0533 38.8786 \
  -gcp 7344.64 7467.87 -77.012 38.8722 \
  -gcp 4911.28 5353.86 -77.026 38.8817 \
  -gcp 4621.91 6858.44 -77.0276 38.8749 \
  -gcp 2528.87 5761.23 -77.0396 38.8798 \
  -gcp 5429.01 3224.15 -77.0229 38.8913 \
  -gcp 5433.9 3222.92 -77.0229 38.8913 \
  -gcp 3698.56 3448.02 -77.0329 38.8903 \
  -gcp 3623.56 3631.47 -77.0334 38.8894 \
  -gcp 3009.31 3514.59 -77.0369 38.89 \
  -gcp 3283.65 3610.7 -77.0353 38.8896 \
  -gcp 2927.7 4022.01 -77.0373 38.8877 \
  -gcp 3892.68 3804.94 -77.0318 38.8887 \
  -gcp 3058.53 5374.32 -77.0366 38.8816 \
  -gcp 4093.72 5910.69 -77.0306 38.8792 \
  -gcp 7320.98 3316.66 -77.012 38.8909 \
  -gcp 7738.56 3826.98 -77.0097 38.8887 \
  -gcp 7739.92 3295.92 -77.0097 38.891 \
  -gcp 7755.51 3482.34 -77.0097 38.8902 \
  -gcp 7296.21 3723.98 -77.0122 38.889 \
  -gcp 6804.33 3235.89 -77.015 38.8912 \
  -gcp 6801.08 3869.32 -77.015 38.8884 \
  -gcp 319.63 7391.94 -77.0524 38.8725 \
  -gcp 300.338 3897.82 -77.0525 38.8883 \
  -gcp 265.529 3509.08 -77.0527 38.89 \
  -gcp 1038.55 3611.29 -77.0482 38.8895 \
  -gcp 1039.54 3708.54 -77.0482 38.8891 \
  Inauguration.jpg \
  Inauguration_4326.tif
gdalwarp \
   -r lanczos \
   -rcs \
   -t_srs EPSG:3857 \
   -wm 1000 \
   -srcnodata "0 0 0" \
   -dstnodata "0 0 0" \
   -dstalpha  \
   -co COMPRESS=LZW \
   -co TILED=YES \
   Inauguration_4326.tif \
   Inauguration_3857.tif
gdaladdo \
   -r gauss \
   --config COMPRESS_OVERVIEW LZW \
   Inauguration_3857.tif \
   $ADDO
rm Inauguration_4326.tif
The script produces a conventional GeoTIFF, which we can render in TileMill, and upload to MapBox hosting.
We can check the spatial accuracy of the georeferencing against our MapBox Satellite layer using the Reference Layer Plugin from within TileMill.
Installed TileMill on your computer.
Reviewed Crash Course
Set up GDAL for processing raster data in the terminal.