Exporting
Once you’ve finished a map design, you can export your map for use in other applications. You can export the entire world or choose a smaller region by setting the bounding box. TileMill can export a variety of formats and each has different advantages.
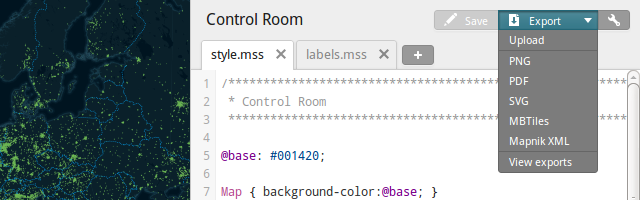
With a TileMill project open, the export menu at the top-right of the window and presents a number of options.
Interactive, multiscale exports
The Upload and MBTiles options will export pannable, zoomable maps just like the preview you see in TileMill. Any legends and interactive elements will be included. Depending on what you are exporting, this process can take up considerable time and disk space.
The MBTiles option creates a package of tiles that can be used in a variety of ways. You can upload them to a MapBox account, host them yourself with TileStream or transfer them to MapBox for iPad for offline access. Technical details about MBTiles files can be found in the MapBox developers documentation.
If you have a MapBox account you can connect it with your TileMill installation and use the Upload export to streamline the process of creating an MBTiles file and uploading it to MapBox.
Static image exports
The PNG, PDF, and SVG export options allow you to export specific views of your map. If your project includes legends or interactive elements they will not be included for these types of exports.
Use PNG to export a static image of your map. This format is useful if you want to add a snapshot to a word processor.
PDF and SVG provide vector-based exports of your map, which are useful if you’re designing maps for printed material or need to make further edits to the design or layout. Both PDF and SVG output should contain very similar content but SVG is often supported by drawing programs natively (does not require conversion upon import).
Mapnik XML export
TileMill’s Mapnik XML export option is aimed at advanced users who are familiar with Mapnik, the software that TileMill uses under the hood to handles rendering your maps.
TileMill uses CartoCSS to translate your CSS styles and layer definitions into the XML format that Mapnik can read each time you save your project. Most users will not need to directly use this underlying Mapnik XML, but it is easy to leverage if you want to move your raw map styles out of TileMill to set up for rendering directly with Mapnik, or other tools that work with Mapnik like TileStache and Invar.
Note: If you export a Mapnik XML file into a TileMill project directory, this XML style will override all of the layers and stylesheets for that project. Any changes you make to the project in TileMill will not be visible until the XML file is moved.
Exports from the command line
TileMill can be invoked from a terminal shell. This is useful for running exports on headless servers or scripting batch exports. To do this you’ll need to find and execute TileMill’s index.js file, the specifics of which will depend on your platform.
Mac OS X
cd /Applications/TileMill.app/Contents/Resources/
./index.js export --help
Ubuntu
node /usr/share/tilemill/index.js export --help
For other Linux distribution or for custom-compiled TileMill installation, you’ll can to navigate to the directory where TileMill is installed and execute ./index.js export --help from there.
Windows
cd "C:\Program Files (x86)\TileMill-v0.10.1\tilemill"
.\node.exe .\index.js export --help
Export examples
To export an mbtiles file into ~/Documents/MapBox/export (the same folder the TileMill user interface will use)
from the geography-class project for a restricted set of zoom levels do:
./index.js export geography-class ~/Documents/MapBox/export/geography-class.mbtiles --minzoom=0 --maxzoom=5
To export a single png image from the geography-class project for a bounding box representing the USA do:
./index.js export geography-class ~/Documents/MapBox/export/geography-class.png --format=png --width=600 --height=400 --bbox="-131.4844,20.3034,-62.5781,51.3992"
How to make the export less verbose
By default Millstone outputs a lot of debugging information, but this can be disabled on the fly by doing:
export NODE_ENV=production
Do this in the shell in which you run the export command.
You can also pass --verbose=off to reduce the amount of output from TileMill’s export script.
Command line export options
Usage:
index.js export [options] <project> <export_file>
Options:
| --format=[format] | Export format (png|jpeg|tiff|pdf|svg|mbtiles|upload|sync). (Default: undefined) |
| --bbox=[xmin,ymin,xmax,ymax] | Comma separated coordinates of bounding box to export. (Default: undefined) |
| --minzoom=[zoom] | MBTiles: minimum zoom level to export. (Default: undefined) |
| --maxzoom=[zoom] | MBTiles: maximum zoom level to export. (Default: undefined) |
| --width=[width] | Image: image width in pixels. (Default: 400) |
| --height=[height] | Image: image height in pixels. (Default: 400) |
| --url=[url] | URL to PUT updates to. (Default: undefined) |
| --log | Write crash logs to destination directory. (Default: undefined) |
| --quiet | Suppresses progress output. (Default: undefined) |
| --scheme=[scanline|pyramid|file] | Enumeration scheme that defines the order in which tiles will be rendered. (Default: "scanline") |
| --job=[file] | Store state in this file. If it exists, that job will be resumed. (Default: false) |
| --list=[file] | Provide a list file for filescheme render. (Default: false) |
| --metatile=[num] | Metatile size. (Default: undefined) |
| --scale=[num] | Scale factor (Default: undefined) |
| --concurrency=[num] | Number of exports that can be run concurrently. (Default: 4) |
| --files=[path] | Path to files directory. (Default: "/home/aj/Documents/MapBox") |
| --syncAPI=[URL] | Mapbox API URL. (Default: "http://api.tiles.mapbox.com") |
| --syncURL=[URL] | Mapbox sync URL. (Default: "https://tiles.mapbox.com") |
| --syncAccount=[account] | Mapbox account name. (Default: "") |
| --syncAccessToken=[token] | Mapbox access token. (Default: "") |
| --verbose=on|off | verbose logging (Default: "on") |
| --config=[path] | Path to JSON configuration file. |