Installing on Ubuntu
This page is for installing TileMill v1.x on Ubuntu Desktop from Github. You can use this approach for a headless Ubuntu Server as well - see the Ubuntu Service for details.
TileMill can also run great on other Linux distributions, Solaris, and FreeBSD - basically anywhere you can run Node.js and Mapnik. But on these platforms TileMill will need to be built from source because, at this time, pre-built packages are only provided for Ubuntu. See the source build instructions for more details. We also have instructions for Mac OS X and Windows.
Requirements
- Ubuntu 10.04+ (only tested with 18.04.2)
- Node 8.11.x+ (may work on earlier version, not tested)
- 2 GB memory
- A modern browser (Chrome, Firefox)
- Internet connection for remote datasources
Installation
Install Node.js, if you don’t already have it on your system:
sudo apt install curl
curl -sL https://deb.nodesource.com/setup_8.x | sudo bash -
sudo apt-get install -y nodejs
If it errors about a dpkg lock, see this site
Install gcc:
sudo apt-get install gcc g++ make
Install git:
sudo apt install git
Clone the github repo to your local machine. Execute this command from your desired base directory:
git clone https://github.com/tilemill-project/tilemill.git
Install the necessary Node modules and dependencies:
cd tilemill
npm install
Then start TileMill and open client in browser, from the command line, by typing:
./tilemill.sh
This will start the core and tile servers, check that they are running, then open TileMill in your default browser.
Alternatively, you can start TileMill servers using either command, in the tilemill directory:
npm start
./index.js
Once the TileMill core and tile servers are running, open your browser and go to:
127.0.0.1:2009
For more details on running from the command line see the Ubuntu Service for details.
Postgres & PostGIS Installation
These steps will guide you through if you want a Postgres & PostGIS database for your TileMill data backend, and want to load OpenStreetMap data sets.
Install Postgresql 10 w/PostGIS 2.4:
sudo apt-get install postgresql-10-postgis-2.4 - User 'postgres' is automatically created - DB template1 is automatically created
You’ll need to adjust PostgreSQL’s access permissions. This is only recommended for local installations. It is NOT secure if you are hosting on a public site:
sudo nano /etc/postgresql/10/main/pg_hba.conf
Page down to the bottom section of the file and adjust all local access permissions to ‘trust’. This will allow you to access the PostgreSQL database from the same machine without a password. Your configuration should contain something like this:
local   all             postgres                                trust

# TYPE  DATABASE        USER            ADDRESS                 METHOD

# "local" is for Unix domain socket connections only
local   all             all                                     trust
# IPv4 local connections:
host    all             all             127.0.0.1/32            trust
# IPv6 local connections:
host    all             all             ::1/128                 trust
Restart your Postgres server:
sudo systemctl restart postgresql.service or:

sudo /etc/init.d/postgresql restart
Create a personal user account - this is very helpful. Since the only user who can connect to a fresh install is the postgres user, here is how to create yourself a database account (which is in this case also a database superuser) with the same name as your login name and then create a password for the user:
sudo -u postgres createuser --superuser $USER
sudo -u postgres psql postgres=# `\password $USER`
Client programs, by default, connect to the local host using your Ubuntu login name and expect to find a database with that name too. So to make things REALLY easy, use your new superuser privileges granted above to create a database with the same name as your login name:
sudo -u postgres createdb $USER
You can now connect to your own database to try out some SQL. Just type:
psql
Creating TileMill Database:
Create a database named osm to store TileMill data:
psql -U postgres -h localhost -c "CREATE DATABASE osm ENCODING 'UTF-8'"
Create the postgis and hstore extensions:
psql -c "\connect osm"
psql -d osm -c "CREATE EXTENSION postgis"
psql -d osm -c "CREATE EXTENSION hstore"
Install osm2pgsql:
sudo apt-get install osm2pgsql
Download OpenStreetMap map extract. You need to download an appropriate .osm or .pbf file to load into your database. Some popular sites: https://download.geofabrik.de/ https://download.bbbike.org/osm/
For example, if you wanted the washington or great-britain extract from GeoFfabrik, using curl or wget:
curl http://download.geofabrik.de/north-america/us/washington-latest.osm.pbf
wget -c https://download.geofabrik.de/europe/great-britain-latest.osm.pbf
Load the osm data file into your osm Postgres database:
osm2pgsql --create --multi-geometry --database osm --username $USER --style "./utils/default.style" --hstore "<replace_with_osm_file_name>"
Additionally, you can nstall pgadmin3 to use a GUI to interact and configure your Postgres databases:
sudo apt-get install pgadmin3
Postgresql config files are stored in:
/etc/postgresql/10/main
Reference sites for further help: https://ircama.github.io/osm-carto-tutorials/tilemill-ubuntu/
WARNING: The instructions below are listed for historical reasons, and will only work with TileMill v0.10.1 or earlier. For v1.0.0 or later, you will need to follow the directions above.
This page is for installing TileMill on Ubuntu Desktop from the Mapbox provided Launchpad PPA. You can use this approach for a headless Ubuntu Server as well - see the Ubuntu Service for details.
Requirements
- Ubuntu 10.04+ (Lucid and above)
- 2 GB memory
- A modern browser (Chrome, Firefox)
- Internet connection for remote datasources
Installation
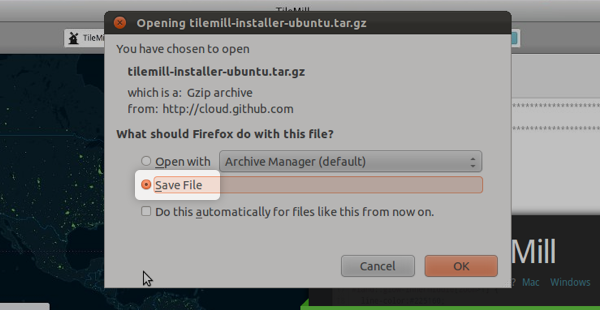
- Download the TileMill installer for Ubuntu. If the download window appears, choose Save File.
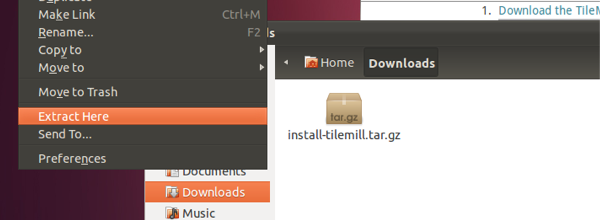
- Select install-tilemill.tar.gz in your Downloads folder. Choose Edit > Extract Here from the menu.
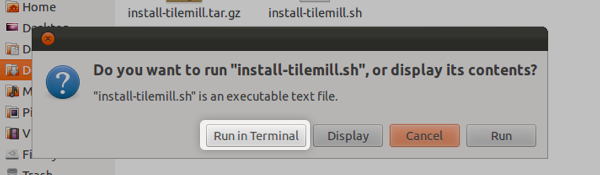
- Double-click on install-tilemill.sh to start the installation process. If prompted, choose Run in terminal. Enter your system password when prompted.
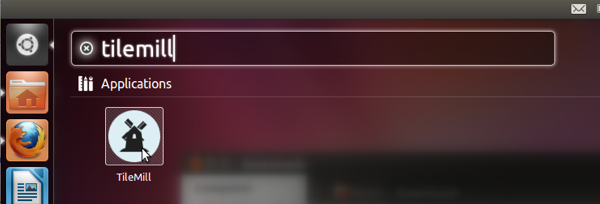
- Start TileMill using the Ubuntu launcher (11.10) or by choosing Applications > Graphics > TileMill from the menu (11.04).
Terminal installation
If you’re terminal savvy, you can install TileMill with the following commands:
sudo add-apt-repository ppa:developmentseed/mapbox
sudo apt-get update
sudo apt-get install tilemill libmapnik nodejs
Then start TileMill from the command line:
node /usr/share/tilemill/index.js
For more details on running from the command line see the Ubuntu Service for details.
Make your first map with CSV data.
Read the TileMill manual.