Working with FileGDB
Installed TileMill on your computer.
You have installed TileMill > 0.10.1
Reviewed Crash Course
TileMill supports directly reading layers inside of Esri File Geodatabases. This support is provided via the OpenFileGDB Driver in OGR and recent TileMill packages contain a bleeding edge version of GDAL inside to make this work.
A FileGDB is actually a folder consisting of various binary files named like a00000049.gdbtable that describe the database and its tables. Usually this folder has an extension like .gdb as if it were a file and depending on your operating system it may show up as a file or folder.
For this example, we’ll cover the basics of loading a FileGDB, setting the projection, choosing a layer, and applying basic styling.
Download the data
- To begin, download the CAL FIRE Administrative Boundaries from the CAL FIRE Fire and Resource Assessment Program. A zipped FileGDB will be downloaded.
- Unzip the FileGDB and you should see the folder
cdfadmin13_1.gdbinside. Extract this.
Learning the projection (aka SRS) of the data
- Note that the projection of the
cdfadmin13_1.gdbis listed by name at the bottom of the download page asCalifornia Teale Albers - NAD83. TileMill does yet support auto-detecting the projection of layers inside of a FileGDB so making sure you know the exact projection is important. - We now need to find the Proj4 representation for this data. We can find this via spatialreference.org by searching for California Albers. This leads us to the page for EPSG:3310 where we can find the proj4 link which gives us this string:
+proj=aea +lat_1=34 +lat_2=40.5 +lat_0=0 +lon_0=-120 +x_0=0 +y_0=-4000000 +ellps=GRS80 +datum=NAD83 +units=m +no_defs
An alternative resource for referencing Proj4 representations is EPSG.io. The Proj4 string can be discovered by scrolling down the page for EPSG:3310.
Adding .gdb as a new TileMill layer
- Create a new TileMill project called
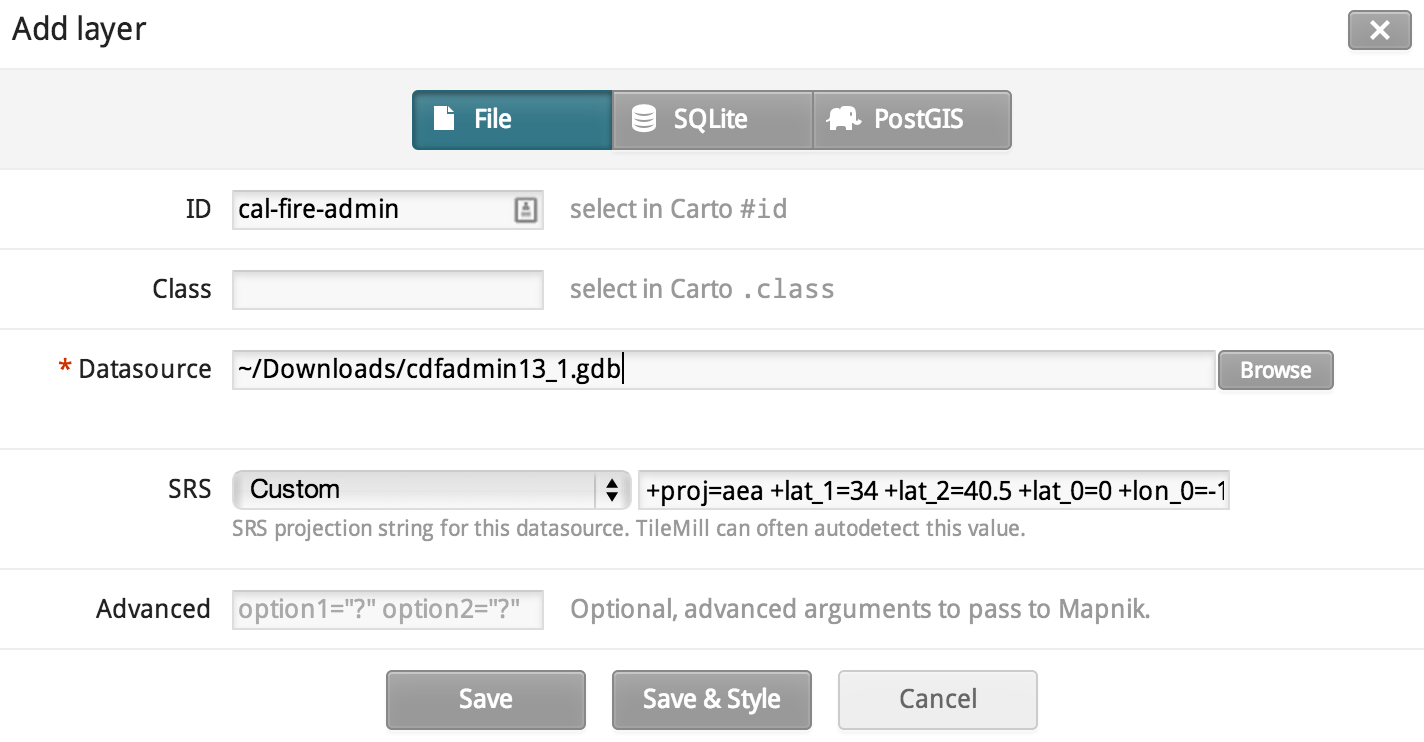
gdb-cal-fire. - Click to add a new layer and choose the “File” tab
- In the
Datasourcebrowse navigate to the location ofcdfadmin13_1.gdband choose it. - Give the layer an
IDofcal-fire-admin. - Paste the custom
proj4projection string from spatialreference.org into the SRS input:
+proj=aea +lat_1=34 +lat_2=40.5 +lat_0=0 +lon_0=-120 +x_0=0 +y_0=-4000000 +ellps=GRS80 +datum=NAD83 +units=m +no_defs
- Then press
Save. - Because this database has more than one layer you will be presented with a new
Layerdropdown. Choose the layer namedcdfadmin13_1_unit.
- Then press
Saveagain which should now forward you back to the style editor.
Styling your map
- Now you can add some CartoCSS to style the
cal-fire-admin. - Add a very simple style:
    #cal-fire-admin {
        polygon-fill:red;
    }
- Press save anf confirm you see the data show up. If you don’t see the data show up click the magnifying class in the layer list to zoom to it. If the data seems like it is in the wrong place then you likely declared the wrong SRS value and you’ll need to return to fix that.
- A more sophisticated style might color each region differently like:
    #cal-fire-admin {
      polygon-gamma:.5;
      [REGION=1] {
        polygon-fill:#ae8;
      }
      [REGION=2] {
        polygon-fill:blue;
      }
    }

Note: Optimizing reading of FileGDB data
To achieve the best performance when reading large FileGDB it is important that the source data either be in EPSG:4326 or EPSG:900913. Other projections should work, but will render slower particularly for large or complex shapes.
</small>
Note: FileGDB data and spatial indexes
Spatial indexes can help speed up viewing of FileGDB when you are zoomed into just a subsection of the data. TileMill supports reading spatial indexes that you can generate in ArcGIS for FileGDB. However this support is currently disabled due to this bug. </small>
Using conditional styles to control the appearance of points based on data.
Using MapBox to upload and composite your map.